If you don’t want to be able to transfer all your precious videos, photos and numbers from your old iPhone into your new iPhone, then this article isn’t for you.
If you don’t want to be able to save all those precious memories such as a baby’s first steps, a beautiful sunset, or a video that makes you cry from laughter, then move on.
If you don’t want to keep your business contacts and stay in touch with your friends by transferring numbers, then this will not apply to you.
But since you are here, you want to know how to transfer data from iPhone to iPhone. Right now, that task may seem daunting but by the end of this, you will be more of a professional with iPhones than anyone else around you. Everyone will be coming to you in order to handle their phone transfers. That’s the power of being informed.
What can you expect to find here? I will have three different methods that you will be able to use for an iPhone to new iPhone transfer. You will see how versatile and proficient you will become once you are done here. You can choose whichever one will be most convenient for you or you can learn all three for the pleasure of knowing. Each will have their own quirks which make them special and unique. Without further ado, let us get this show on the road!
PS: For people who need to know how to clone a phone without touching it, just click it.
Method 1: Sync two iPhones for data transfer via iTunes or iCloud
iTunes
When it comes to using iTunes for the transfer it is relatively simple. You need to connect your old device to iTunes through your computer. This is accomplished with the USB port. Once iTunes starts up, you can click on the iPhone and choose BACK UP.
Once that is done, you can disconnect the old device and bring in the new iPhone. As it turns on, it will give you an option on how to set it up. Select the option “Restore from iTunes Backup” and then connect the iPhone to your computer.
On the computer (or laptop), you choose the backup you created and hit “Continue.”
That’s it! Now the iPhone to new iPhone transfer occurs, the phone will restart once it’s done, and you will have all your precious data.
iCloud
This process is very similar to the iTunes version of the transfer. You may even argue that this method is faster as you don’t have to connect to your laptop or desktop at all! You will need an internet connection for this method.
In your old device, you will create a backup for the cloud by hitting “Settings → Cloud → Storage & Backup → Back Up Now.” That’s it! Simple!
Now grab your new device and start it up. As you progress through the setup, instead of choosing “Restore From iTunes Backup”, you will choose “Restore From iCloud Backup”.
Now your new device will start the backup. It can go either fast or slow depending on your internet connection. But once it’s done, you will have everything just the same as if you did the iTunes backup!
For both these methods, you will need your Apple Id and Password. If you don’t remember that, it could become an issue. If you don’t have enough space in your cloud, then you might also run into some issues. You would have to sacrifice some data over others.
Furthermore, if you are going to use the Cloud, you will not get to save over any apps that you may have downloaded. If that app is no longer available on the marketplace, that is the end of that apps lifespan. The iCloud backup could become corrupted if the servers at Apple are having some difficulties.
The iTunes version needs weekly backups if you are going to keep up with your data. If you forget to do it and need to transfer immediately, you will lose out on whatever you have not yet to backup.
That is not very ideal especially when we have all this wonderful technology at our disposal.
Method 2: Transfer data from old iPhone to new iPhone by MobileTrans in 1-click
Introducing MobileTrans!
What is MobileTrans? In a word, it is a tool. This tool will help make your transfer from iPhone to iPhone seamless and easy. Trust me, you will be amazed with how simple it is to use MobileTrans. You will wonder how come you never heard of it. It will be extremely effective as a tool for completing your transfer. How?
You will be able to transfer contacts, text message logs, calendar, photos, music, and videos! It will do all of this with ease. This tool doesn’t just work with iPhone to iPhone. It goes farther than that as you can go from Android to iOS, iOS to Winphone, iTunes Backup to iOS and much more combinations. You can even get your Blackberry Backup on to your iOS! It’s been a while since Blackberry was the most popular phone around but it still gets its due with MobileTrans.


MobileTrans is one of the best tools for mobile to mobile transfer. You have options here as there are two methods to be aware of when using MobileTrans.
Way 1: Transfer data directly with two phones available.
So how easy is it to do an iPhone to new iPhone transfer when you use MobileTrans? I am going to show you.
Now get ready because you are going to love this!
I First, you are going to open Wondershare MobileTrans.
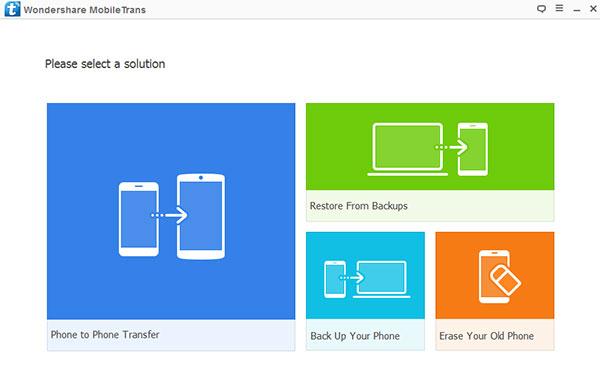
II Next, a screen is going to be made present on the screen. You are going to see an option of Phone To Phone Transfer. It will have the image of one phone pointing into another phone.

III
The operating table is now set. You will have both your devices connected to the computer (or laptop) through USB cables. Both of these devices MUST be recognized by MobileTrans otherwise no dice. If you are worried because the source and destination are incorrect, do not fret. You can hit the FLIP button to make sure the information is going into the right phone.

IV
Now you got the source and destination correct. Both phones are recognized by MobileTrans. What’s next? You are going to select the information you want transferred. You hit the checkboxes next to everything you want transferred such as contacts, text message and calendar. You can clear all the data of the new device before transferring if you so desire by checking the box “clear data before copy”.

V
Selected all the data you want transferred? Great! Now hit “Start Transfer”.

That’s it!
It’s as simple as tying your shoe lace.
Way 2: Restore iTunes/iCloud backup to new iPhone
You can also use MobileTrans for your iPhone to new iPhone transfer. This will also be a simple process that you can appreciate.
I First, you are going to open Wondershare MobileTrans.
II
Next, a screen is going to be made present on the screen. Instead of choosing the Phone To Phone Transfer option, you will pick the Restore From Backups option. You will get to choose where the backup comes from. You will click on iCloud.

III
You will sign into your iCloud so make sure you have your ID and password ready. The new device will be connected to the computer. As I mentioned in the first method, you must make sure the device is recognized by MobileTrans. Otherwise, no dice.

IV
Now once you have your device recognized, pick the iCloud back up you want on your new device. Once selected, the backup will begin downloading.

V
Once it’s done, select which content you want on your new iPhone and hit the “Start Transfer” button. As I mentioned previously, you can clear all the data of the new device before transferring if you so desire by checking the box “clear data before copy.”

That’s it!
Of course, here you need to create a backup on the cloud first with your older device. However, once that is done, it is easy to complete your iPhone to new iPhone transfer. You will love how easy and great MobileTrans is to you.
Method 3: Transfer data from old iPhone to new iPhone by FoneTrans
There is another tool that can assist you with your iPhone to new iPhone transfer. It is just as easy to use as the MobileTrans tool. FoneTrans has an advantage over MobileTrans as it is more in depth with its options. Allow me to explain what I mean.
I First, start up FoneTrans on your computer.
II Next, you are going to have both your iPhones connected to the computer via USB. Once that happens, FoneTrans will recognize both devices so you can get underway.

III
On the left side of the screen, you will see both of your phones. Click on the older phone and go to “Contacts”. This is where FoneTrans shines! All your contacts will show on screen allowing you to pick which contacts you want for the transfer. You can do the same when it comes to media, play lists, photos, books and text messaging!

IV
Once you have finished selecting your contacts, hit the import/export tab on the top of the screen. You can choose either import contacts, export selected contacts, or export all contacts. If you selected your contacts, go ahead and hit export selected contacts. Just make sure on the bottom of that, it says the name of the phone you are exporting from.

Simple and easy.
There you are. You have three different methods of completing an iPhone to new iPhone transfer. There is no way after reading this you will NOT be able to complete this transfer.
You are now more informed and ready than most to complete this task. You might even be better than the store clerks who work at your local phone store. Don’t be surprised when people pick up on your tech savvyness. It will be a glorious moment.
Just to recap, you can choose to use iCloud or iTunes, MobileTrans or FoneTrans.
The advantage from FoneTrans is clear as you can get very selective with all the data you want to pick. You can get very in depth with this tool as you will get EXACTLY what you desire into your new iPhone. From photos, to contacts or even tools, you can pick what you want to transfer. If there is anything that was gathering digital dust, you can say goodbye to it and let your new iPhone have a fresh start. You might be surprised by how many people are digital hoarders.
If speed is your gig, you can choose the MobileTrans option to do it quickly. If you time yourself using MobileTrans, you will do it faster than most fast food restaurants getting your food ready. In today’s busy world, time is the most valuable commodity and you can definitely make quick work of your iPhone to new iPhone transfer with MobileTrans.
If you want to use what is available without downloading anything else, you can use the iCloud or iTunes Method. The downside is that you may not get all the data you want transferred. It also may take longer depending on your connection to the Internet. If you have a slow connection, be prepared to step away for a while. Just don’t plan on having any important phone calls come in during that time. You will miss them. But, if you have time on your hands and you want to get familiar with the Apple interfaces and products, then this is the way to go.
No matter which option you choose you will complete your iPhone to new iPhone transfer. It is only a matter of preference. Each method has their own unique edge.
Now go grab your phones and get busy. Your new iPhone is waiting for you.
You are more than ready for this.
Enjoy!