
One of the common queries that iPhone users have is how to get photos off iPhone. Apple phones have one of the best camera features you can find in smartphones. The inbuilt editing tools further enhance the picture quality. While you may be proud of your iPhone photos, when it comes to backing them up or clearing space for more of the images many iPhone users are unsure about the right way to do it without any hassle.
The main issue here is finding a quick, efficient and safe way to get photos off iPhone without any professional help. Here are five methods which can be used to solve the issue of moving your photos from iPhone. Have a look at these plans to know which method offers the best option all around.
- Method I: Get photos off iPhone to Mac or Windows using FoneTrans iPhone Photo Manager
- Method II: Get photos off iPhone with dr.fone iPhone photo transfer software
- Method III: Get photos off iPhone through Email
- Method IV: Get photos off iPhone to your Mac using AirDrop
- Method V: Get photos off from iPhone to your Mac using iPhoto
Method I: Get photos off iPhone to Mac or Windows using FoneTrans iPhone Photo Manager
To get photos off iPhone FoneTrans iPhone manager is a great third party app. It provides a simple and easy way to move photos to Mac or Windows and the process is not an elaborate one. You need to employ just a few clicks.
Here are the steps to follow
Step #1
Before you start the process of moving the photos ensure you have your iPhone and its USB cable ready. You should have Fone Trans iPhone Manager installed in your computer.
Step #2
To use Fone Trans phone manager tool for iPhone download the software and install it in your system. Launch the software. If you want to transfer the photos to your Mac, install the software in the Mac version available.


Step #3
On the sidebar present to the left side of interface click on ‘Photos’ option. Select photos type. This will help you to view all the photos and select specific photos you require to move to your computer.
Using multiple selections is possible. You need just to press the Ctrl button on the keyboard.
Step #4
Once you have selected all the photos you need, choose Export to option and click on Export to PC.
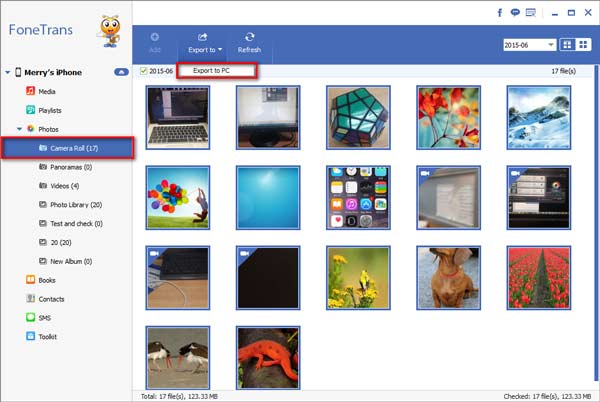
Now the selected photos will be transferred to your computer from the iPhone.
Step #5
Now return to Step#1 and select the photos in the iPhone that you had moved to your computer. Tap on delete button present in the bottom part to the right. The photos will now be deleted. This is how you can get photos off iPhone successfully.
Method II: Get photos off iPhone with dr.fone iPhone photo transfer software
dr.fone – Transfer (iOS) is a popular software tool that enables an easy and quick transfer of photos as well as other media files to Windows PC from iPhone. iPhone users will find this software tool very beneficial as the features are not only effective in photo and media file transfer but are also not found in other photo transfer products.
Important dr.fone – Transfer (iOS) Features
dr.fone – Transfer (iOS) offers users several benefits. Here are a few important benefits you should know of:
- Single click transfer of videos, photos and any other data from iPhone to PC
- The software program supports Mac and Windows computers
- dr.fone is capable of transferring entire playlists in music files individually without any hassles
- During transfer, the software automatically does id3 information fixing and maintains song play counts and rating.
- It is possible to do a direct transfer of videos, photos and various other information straight away to your Mac or computer
- It converts all audio files in various formats during transfer
- The software helps you to delete, rename or export playlists on iDevice
- It is easy to edit all contacts present in your iDevice directly through dr.fone
As you can see this software tool has enabled an efficient, quick and simple data transfer to your PC or from it with your iPhone. Users can further benefit from the program as the trial version is available for free download. Users can use the product prior to purchase it and test its efficacy.
Instructions to get photos off iPhone via dr.fone Transfer
Step #1
Download the software based on the type of computer you have as the software is available in Mac and Windows PC.
Step #2
Install the software in your computer and launch it. This can be done on Mac or PC. For transfer to PC, you need to use USB cable to connect the iPhone to the PC.
Install and launch dr.fone on your PC or Mac. Here we take Windows version on PC as an example. Now connect iPhone with PC via the Apple USB cable. The primary interface will be shown as below.


Step #3
Click on the ‘Photos’ feature present in the top interface panel present in dr.fone Transfer. You will be able to view all photo albums in your iPhone saved in Photo Library, Camera Roll, Photo directory, etc.,
Step #4
Select all the photos you need to move to the computer from the albums. Click on ‘Export’ option and ‘Export to PC’ option next.
![]()
Browse to confirm the destination file is in your PC. Click on ‘OK’ option. This will start the transfer process, which will be completed in a few seconds.
Method III: Get photos off iPhone through Email
This is a simple method to transfer photos from your iDevice to locations where it is possible to use Email.
Here are the step by step instructions for this method
Before you begin, ensure you have a proper WLAN connection to transfer the photos to your email from iPhone.
Step #1
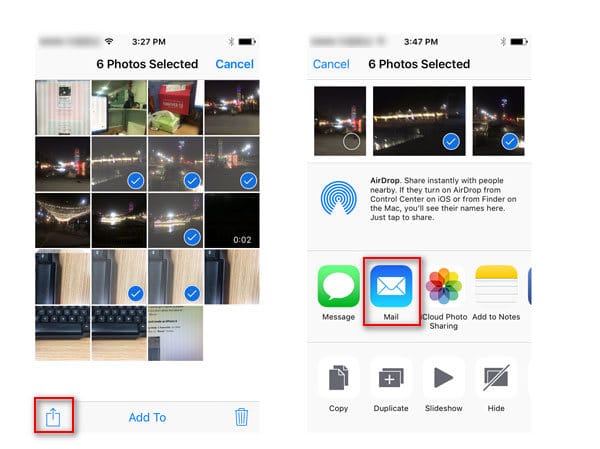
Go to ‘Photos’ feature in your iPhone. Find photos in the Photo Stream or Camera Roll and tap on select option present in the top right corner. You can now choose the photos you need for the transfer.
Step #2
When you have selected the photos needed, tap on ‘Share’ button present in the bottom-left corner. Select the ’email’ option and enter your email address. You will be able to transfer the photos to your inbox or any other individual’s email inbox you want to move the photos to.
Step #3
Now log in to the email address to which you have sent your photos. You can easily download the photos to your computer from the inbox.
Step #4
This is a simple way to transfer the photos in your iPhone to your computer. But the process is not over yet. You have to repeat step one to select photos from your iPhone and tap on ‘Delete’ option to erase the photos.
Now you have completed the process successfully.
Method IV: Get photos off iPhone to your Mac using AirDrop
AirDrop is identical to Bluetooth feature used for sharing photos, websites, locations, videos and more between Apple devices. AirDrop can also be used to get photos off iPhone to your Mac computer.
Step by step instructions
You need to have an active Wi-Fi connection, Bluetooth, your iPhone, Mac computer with X Yosemite operating system or a later version.

Step #1
Choose Go option in your Mac. Select AirDrop present in the Finder menu bar. If your Wi-Fi or Bluetooth is not activated, you can turn the feature on by clicking the ‘ON’ button. When the Wi-Fi and Bluetooth are on, AirDrop automatically turns on.
Step #2
In your iPhone, complete the step one procedure in Method III to select photos you need to transfer.
Step #3
Open the Control Center in your iPhone by swiping upwards from the screen bottom. Tap on AirDrop and select ‘Everyone’ option. You will see your Mac displayed in the sharing list in your iPhone
Step #4
Tap on the Mac image and choose ‘send’ option. In your Mac computer, click on ‘Accept’ option to save the photos you had transferred from your iPhone. The photos will be saved in the Downloads section in your Mac.
Step #5
Repeat step#4 in Method III to completely delete the photos you have moved.
This method is effective in all iOS devices such as iPad, and instead of Mac, AirDrop can also be used to transfer photos from iPhone to iPad
Method V: Get photos off from iPhone to your Mac using iPhoto
iPhoto is a free app present in Mac computers. Its chief function is related to photos. Here is a step by step instruction on this method. Before you start, ensure you have the iPhone and Mac connected via USB cable.
Step #1
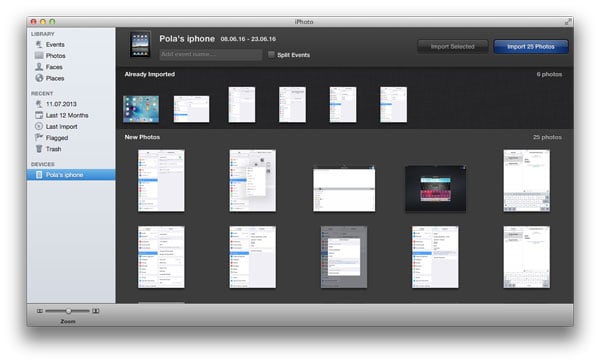
Once the iPhone is linked to Mac, iPhoto gets launched automatically. You can select the iPhoto app by going to the Applications folder in your Mac, if the app does not launch automatically.
Step #2
Choose the photos you need to move and click on ‘Import Selected’ option. Or you could also click on the ‘Import n Photos’ option. Now select ‘delete photos’ option that appears in a separate popup window. You can now delete the imported photos present on the iPhone.
Once you have transferred the photos to your Mac computer, it is easy to print or edit them.
In the above 5 methods it would be apparent that dr.fone – iOS Transfer and Fone Trans iPhone phone manager are the most effective tools to get photos off iPhone easily and effectively. With bonus photo features, easy steps and quick process these two methods score over the rest easily.