Frankly many iPhone SE users will confront a problem that they lost their iPhone SE files. And all of the iPhone fans know that the lost or deleted data can be found back by iTunes backup, for it is the securest way to recover files from iPhone.
It would be very lucky for you to sync your iPhone with iTunes as you can easily find your lost files from the iTunes backup without Internet (while the iCloud backup recovery requires WLAN). Now you will know how to do it with the following instructions.
1 How to sync your iPhone SE with iTunes
Prior to the recovery of backup from iTunes, you should make sure your iPhone SE has synced with iTunes. If not, what you need to do first is to prepare USB cable and the latest iTunes vision on your computer to make iPhone SE backup on iTunes.

Step 1. Open your latest iTunes and run it.
Step 2. Connect your iPhone SE with the computer via USB cable, waiting for your iPhone symbol turning up in the window of iTunes.
Step 3. Choose your iPhone SE in the window, and tick the option “This Computer”. Then click the button “Backup Now”, therefore your iPhone will be backuped on the iTunes automatically.
2 How to recover iPhone SE lost files from iTunes backup by iTunes Backup Extractor
After finishing backup your iPhone SE on the iTunes, you may wonder what the next to do with the recovery is. Now there is a tool calls iTunes Backup Extractor which enables you to preview and restore iPhone SE from the old backup file, like photos, music, contact or Safari data. According to your PC system, you can download iTunes Backup Extractor and you also should make sure that this PC is actually where your iPhone backup is.


Step 1. Launch and run iTunes Backup Extractor
After downloading, launch iTunes Backup Extractor and run it immediately, and open your iTunes at the same time

Step 2. Choose iTunes backup and scan it
Choose the mode “Recover from iTunes Backup File”, and then click “Start Scan”. Then you need to wait for the appearing of the iTunes backup.

Step 3. Scan and extract backup
After that, all iTunes backup will be turned up in the right sidebar, and then you can preview the contents of your iTunes backup. Choose your lost iPhone SE files, photos or something else, and click “Recover” button to get them back from iTunes to your computer.

Tips:
1. You can view all of your iTunes backups and extract some of the files by the free version of iTunes Backup Extractor. But if you want to get all the files and photos or other data from the iTunes, you need to download the full version of it.
2. If you haven’t synced your iPhone with iTunes, the mode in the right sidebar “Recover from IOS Device” will be a good choice for you. And if you want to recover from iCloud backup, you can also choose the last mode “Recover from iCloud Backup File”.
3. Once you iPhone SE damaged by water or some else, you should immediately recover the data in the computer where you have already synced your iPhone with iTunes. And choose the mode “Recover from iOS Device”.
3 Another way: recover iPhone SE files from iTunes backup via iTunes for free There is also another way of recovering the iTunes backup files and it is free – iPhone SE data recovery via iTunes. The following tips will be essential for your recovery.
1.Only iTunes backup data is allowed to be extracted from iTunes to iPhone, but viewing the backup other than music is limited by the iTunes.
2.Once you recover backup from iTunes, all the files will be retrieved instead of certain photos or music.
The steps of recovery will be instructed as followed:
Step 1. Connect your iPhone SE with PC
Connect your iPhone SE with your computer via USB cable, and open the latest iTunes in your computer.
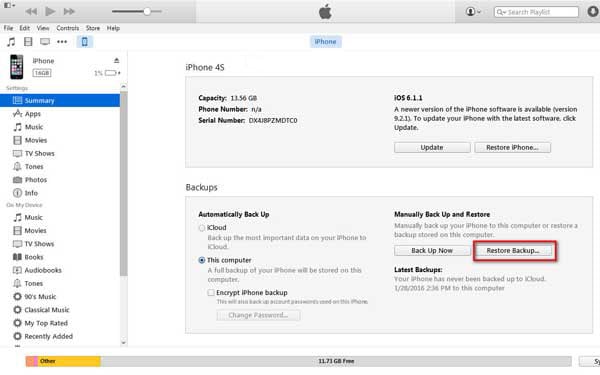
Step 2. Freely retrieve iPhone SE from iTunes backup
After connecting your iPhone SE with PC, you will see a symbol of your iPhone SE. Then click it, and choose the button “Restore Backup” to recover iPhone SE files from iTunes backup.
Although recovering iPhone SE files from iTunes backup is a free way, it also has many drawbacks. So which is the best way, you need to figure out by yourself.